About Me

My photo
Just a simple gal living on the outskirts of Portland making ends meet. I have lived in Portland for over 20 years and I am happy to call it home. On this blog you will find everything from cooking to my crazy life. I hope you enjoy.
Showing posts with label brown sugar. Show all posts

Sunday, October 18, 2015

Pie crust cookies

I saw this recipe on Pinterst a few weeks back and I thought I would give it a try to see if I liked it enough to possibly make and take it somewhere. It was o.k., but not great. I can see where improvement could be make.
You start with two refrigerated pie crusts sprinkle a little flour on your board and lay out the first crust. slightly roll it to get rid of any wrinkle and make it lie flat (wish I could slightly roll my forehead and get rid of any wrinkles).
spray the top of the cookie sheet with a little baking spray and sprinkle with some finely chopped, dried, sweetened cranberries, finely chopped walnuts or pecans and some cinnamon and sugar.
Take the second crust and place it on top of the first covering the cranberries and nuts inside. Slightly roll them together until they form a single crust with the filling showing through. Spray the top with some more cooking spray and sprinkle additional cinnamon and sugar on top.
Then the fun part. Get out your cookie cutter (metal works best) and cut as many possible shapes from the pie crust round. You can wad the pie crust up and roll is out a second time if you need to.
The fun part! Place cookies on a parchment lined cookie sheet and bake like you would pie crust.
They turned out fairly good, but if I had them to do over (and I will do them over) I would brush on melted butter instead of spraying cooking spray, brown sugar and cinnamon instead of white (maybe even drizzle a tiny amount of honey, a little fresh orange zest would go a long way in this recipe. The cookies worked but the flavor was lacking. I am not sure if using homemade pie crust would be doable because store bought pie crusts are more resilient.
I have been busy lately and haven't had time to sit down and really think out a recipe and get it together with photos. The bf and I are expecting a (you fill in the blank), and so we are trying to settle or nest rather. Katsu is doing well, but has had his moments where we just look at him and shake our heads. The last episode involved him eating a plastic cone off his head...I didn't blame him, those are not a great fashion statement, but it caused me extreme stress and worry while he slowly but surely passed all of it. My daughter moved out so we have redecorated her old bedroom into my new office/sitting room. We still have a few things to acquire, but it is coming along really well. I refinanced my house, so it looks like the bank is stuck with me for the next 30 years give or take. So between my daughter moving, house refi, dog acting crazy you can see why I didn't have time. Looking forward to the next few weeks to get things completed...Samhain is just around the corner and in case I don't get back here between now and then I hope everyone has a wonderful holiday.

Tuesday, August 11, 2015

Powdered Buttermilk

Have you ever walked by a product in the grocery store and told yourself that someday you would have to try it? I have been passing this product by in my grocery store for years, always wanting to try it but never seeming to grab a can and have it make it into my shopping basket. Well that ended the other week. I grabbed up a can on my way through the baking aisle.
It works great! I have used it a couple times, once because I forgot to buy buttermilk and once because I forgot I had buttermilk...that's the way I roll. I used it last night to make one of my latest favorite quick bread recipes to go along with a pot of white beans and ham soup. The weather is playing hot and cold with us, so one day we will be 70 and the next we soar back up to 90.
The white bean soup is simple enough. You take one pound of dried white beans (I used northern beans) 1 medium sized smoked ham shank (I had the butcher cut it into 3 pieces), salt, pepper. Take the beans and rinse them good and add them to a large pot, nestle the ham shank sections into the bean and add enough water to cover the beans. Turn the pot on and bring to a boil, when the pot boils turn down to a simmer add the salt and pepper (to taste) and put a lid on it. Check the pot every so often to stir the beans and add water when needed. When meat is tender pull it from the soup, take the meat from the bones and put it back in the pot. When the beans are about an hour away from being done add 1 tablespoon of brown sugar. adjust your salt and pepper add more if needed. Cook until you reach the desired consistency.
Short and sweet this week. I have been exceptionally busy, but hope to make a little more room for new recipes with fall around the corner. Have a great rest of the week.

Sunday, February 15, 2015

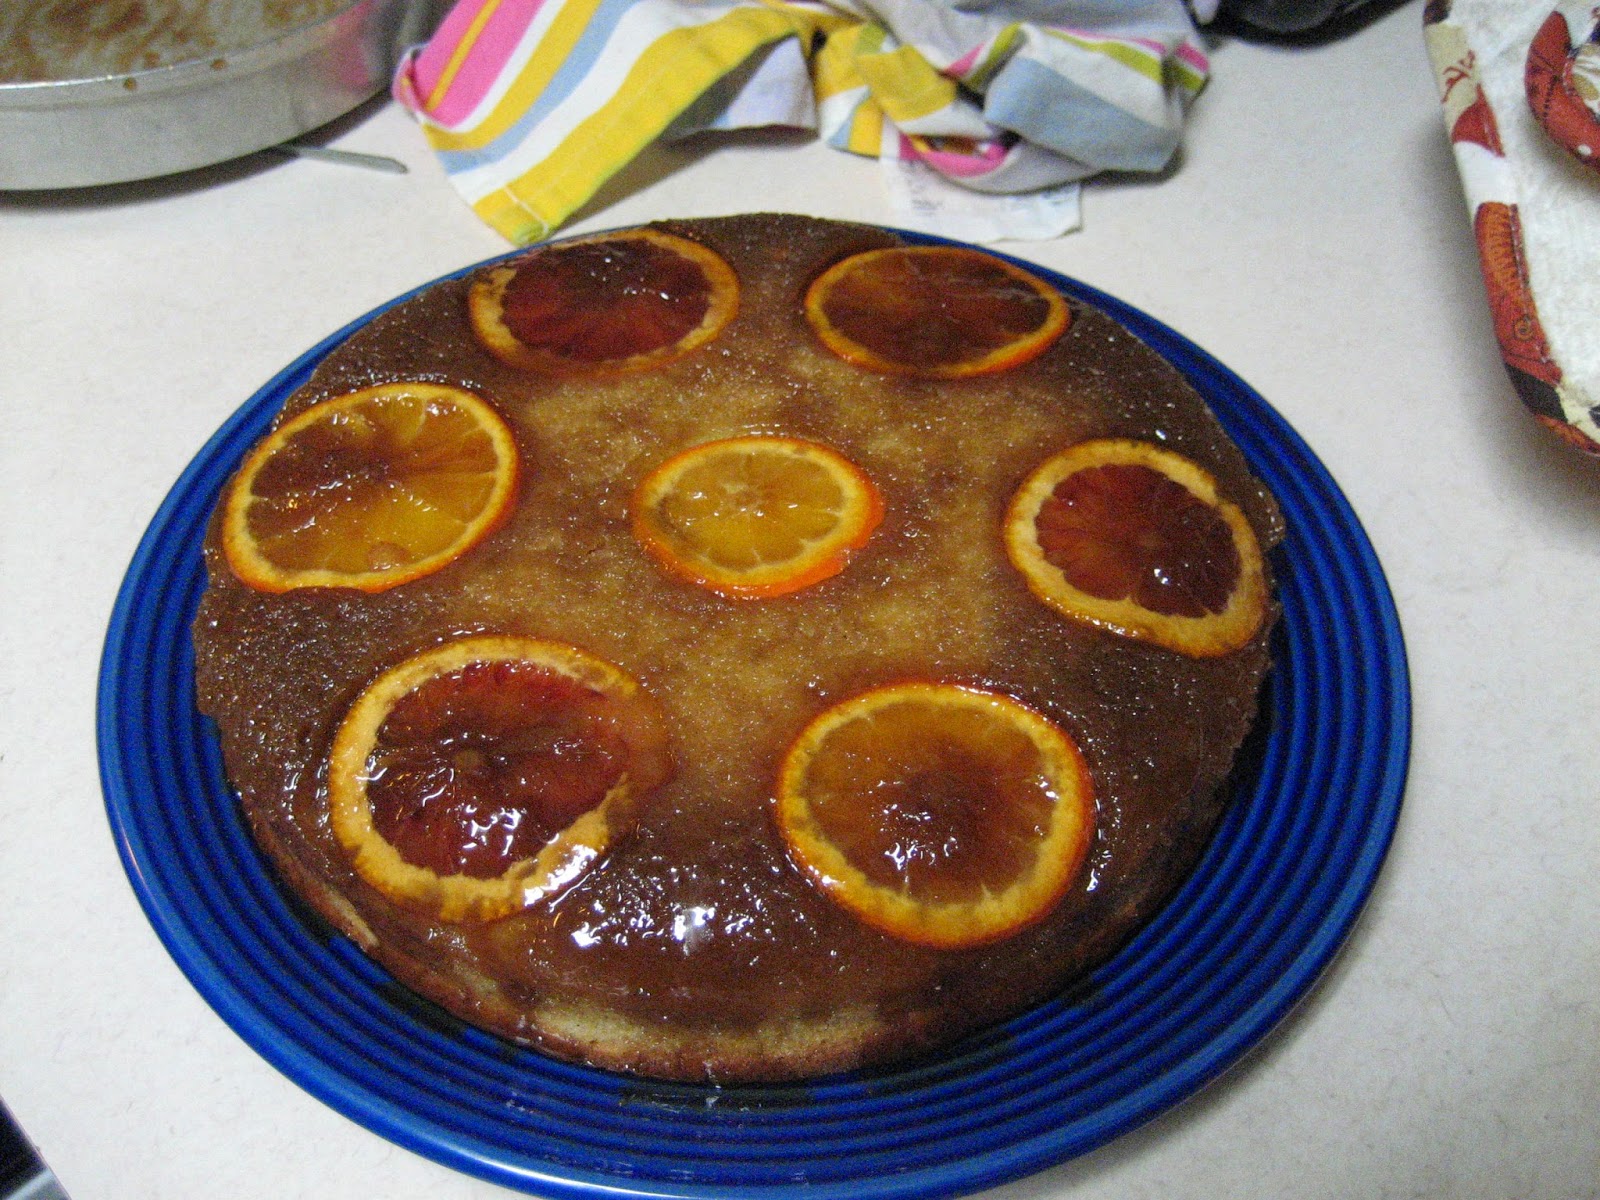
Citrus Upside Down Cake

Many years ago, maybe even in another life, I was told Cardamom was great with hot chocolate. I was a young woman with nothing more than 6 years of home ec. under my belt I went out and bought a bottle of this pricey spice and kept it on a shelf somewhere until my youngest graduated from high school...never used it once. Threw it out never knowing just how wonderful it would be in all manner of foods. I have used it twice in the past three months. in Ginger cookies and now in this fantastic Citrus Upside Down Cake. This cake is the dessert portion of my Valentines Day Dinner.
butter a 9 in. cake pan and line the bottom with parchment paper. Preheat your oven to 375 degrees.
In a small saucepan combine 3 tablespoons unsalted butter, 1/2 cup light brown sugar (you can use dark), 1 tablespoon honey, 2 teaspoons lemon juice and cut and set aside about 5 thin slices citrus, enough to nearly cover the bottom of an 8-inch cake pan. melt the butter over low heat with the light brown sugar, honey, and lemon juice, whisking until the sugar has dissolved. Remove from heat and pour syrup into the cake pan. Arrange the sliced citrus on the bottom of the pan in a flat even layer. Set aside.
I used blood orange and tangelo.
Looks so pretty. Next time I am going to overlap a few slices to fill it in a bit more.
In a bowl combine 2 cups flour, 2 teaspoons baking powder, 1/2 teaspoon salt, 1/2 teaspoon cinnamon and 1/2 teaspoon cardamom.
In another bowl combine 4 eggs, 1 1/3 cup granulated sugar, 1/2 cup olive oil, 1/4 cup orange or blood orange juice, 1/4 cup citrus juice of your choosing, 3 tablespoons whole milk, 2 teaspoons vanilla extract and 1 teaspoon grated blood orange zest. Whisk until blended.
Gradually add dry mix to wet mix.
Pour batter onto cake til pan is 3/4 of the way full. If you have batter leftover (I did) I made a small 6 inch layer cake. That I cooled and froze for a later use.
Bake for around 30 to 40 min. or until cake tests done with cake tester. Cool for at least 30 min. before flipping cake out of pan. Make sure you loosen the edge first.
Look at how pretty that is. It was really delicious and I am looking forward to having a reason to make it again. The little layer cake is going to be carefully cut to make two layers and frosted with a yummy orange buttercream frosting for friends dessert following a dinner I am making for them.
We had a lovely Valentines Day dinner as well, as usual the bf handled the grill masterfully and everything was spectacular. I hope everyone had a wonderful day. Enjoy the rest of the weekend.

Sunday, November 16, 2014

Christmas Cookies

So I have been working on some Christmas cookies to bake and give this holiday season and I think I have come up with a couple of recipes so far that will be perfect for gift giving. A few weeks back I made Chocolate Anise Biscotti and I had mentioned that I was going to switch out a few things and do a lemon blueberry flavor...well it turned out delicious.
I simply left out the anise and chocolate and made the addition of the zest from one lemon and 1/2 -1 tsp. of lemon extract and a handful of dried blueberries. Then to finish I mixed some confectioners sugar with some fresh lemon juice and drizzled over the completely cooled biscotti.... it was delicious. Big hit with both my office and the bf's office. This will probably end up on my cookie gift giving list.
The other contender is Chocolate Espresso Snaps. Super simple and they really satisfy that chocolate craving. These were also a huge hit with the co-workers
Into one bowl you add 3/4 cup butter, 3/4 cup shortening, 2 cups of white sugar and 1/2 cup brown sugar. Cream these ingredients together. Into the second bowl mix together 3 cups of flower, 1 cup Dutch process cocoa powder, 2 Tlb. espresso powder, 4 tsp. baking soda, 1 tsp. salt.
Into the first bowl with the creamed together butter and sugar add two eggs one at a time blending between each egg.
Then start adding the contents of the second bowl to the first bowl 1/2 cup at a time blending between each addition.
Yum...chocolate cookie dough.
Roll the dough into 2 inch balls and then roll in sugar. Place on parchment lined cookie sheets and bake in a 350 degree oven for somewhere between 12 to 14 minutes (depends on your oven).
Let the cookies cool on the cookie sheets for several minutes before transferring to cooling racks to cool completely.
When completely cooled you can store these scrumptious cookies in a airtight container...Ummm we ate them one and all over the course of a weekend. Monday saw the last of them going to the bf's office.
For me Christmas gift giving cookie has to be simple yet scrumptious. I have to be able to easily half the recipe if needed, and the cookies have to hold up well for traveling over the river and through the woods. I don't want something that is really complicated or fussy. A cookie that stands up well to hot cocoa and compliments the flavor and will also go nicely with that glass of milk for Santa Claus. I have one more recipe to try out this week, but first I need to replenish my supply of parchment paper...Have a great rest of the weekend.

Monday, August 11, 2014

Smoking Salmon

The bf was given the lovely opportunity (thanx T.S.) to spend a day salmon fishing in our lovely Pacific Ocean. He was hesitant to go because he has never, ever gone fishing before...He caught 5 kept two for himself and shared with others less fortunate (less fortunate means green and seasick)and others that were having no luck at all. The bf came home with two lovely tasty salmon one he had left cleaned and whole the other had been turned into two very healthy fillets that were screaming to me...SMOKE MEEEEE!
The first thing I ever smoked was salmon. I know there are people out there who fuss and worry about it and I am sure there are some tall tales told around campfires that start something like...I remember the first time I ever had me some smoked salmon. I didn't really put much thought into it except one thing...I remember my Unk saying "keep it simple and don't ruin the flavor with too much smoke"...clear as mud to a 13 year old.
But those very words came back to me when it came time to smoke my first fish, and that is exactly what I did. I used a simple solution for the overnight brine of the fish. Ingredients6 to 8 cups of cold water, 1 cup of non-iodized salt, 1 cup dark brown sugar (you could use light, I prefer the flavor of dark better), 5 big cloves of garlic peeled and crushed and 1/4 cup teriyaki sauce. Mix all of those together in a glass, plastic or stainless steel container making sure that the salt and sugar has mostly dissolved. Place the salmon into the brine at least 12 hours. I brine my fish over night. I also cut the salmon into long strips before I put them in the brine.
Salmon floating in nice brine going into the fridge for the night. I love this brine recipe the fish comes out with a nice clean flavor.
The next morning you take the salmon out of the tubs and pat the pieces dry with paper towels. I don't rinse my fish even though a lot of recipes call for it. Then after you have gotten them all dry the fish gets to sit at room temperature on a cookie sheet for about 4 hours and it develops this sheen to it called pedicle...You want that to happen.
Spray your racks with non stick cooking spray and leave enough room between the pieces of fish for good circulation. Load your smoker with the racks of fish.
I used Alder chips for the salmon, it has a nice mild flavor and works well with fish.
Then for the next several hours (depending on the size of the pieces of fish and the thickness)you rotate the wracks of fish and change out the pans of chips once they get burned up. I went through 4 pans of chips.
The end result is totally worth spending a day doing this. The fish is a wonderful treat for us, and we are enjoying it. Make sure you keep it in an airtight container in the fridge after it cools and you remove it from the racks.
Well that is all for today...It has been hot out and I am getting tomatoes every single day off my two plants. I need to start taking care of those. I think I am going to start by giving some away...lol. Have a great week everyone.